Don Orkoskey | August 26, 2025

Vignetting puts a spotlight on your subject & draws more attention to your photos. It keeps viewers look at your photo longer. In this article you'll learn how to use vignetting. As a result, you'll improve your photography and build a bigger audience. First though, you need to understand what it is and why vignetting works. Then, we'll learn to apply it.
What Is Vignetting
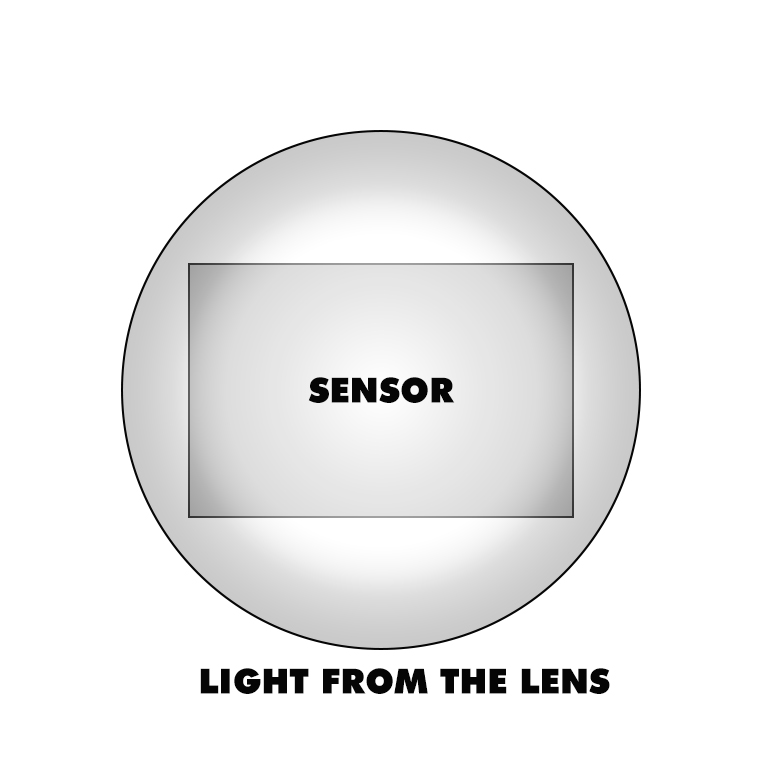
Vignetting is a process whereby the edges of our photo appear darker than the center.
This usually occurs naturally. When the cone of light coming from our lens doesn't provide as much brightness at the edges as compared to the middle of the frame we get vignetting.
Darker areas vary from lens to lens. In fact, less expensive lenses often have stronger vignetting. Too, if you place a cropped sensor lens on a full frame camera you'll see a lot of vignetting.
Reducing Vignetting
That being said, lens manufacturers try to eliminate vignetting. If you want a strong sense of vignetting then you may need to add it yourself in editing. You can easily add vignetting in programs like Adobe Lightroom.
Reverse Vignetting
Additionally, you may have seen reverse-vignetting. This is where the edges of a photo fade to white. There was a trend in the 1970s to use heavy reverse vignetting. In fact, white vignetting was a style used widely in wedding photos of the era. As a result, the technique is only fashionable in a retro way.
How Vignetting Attracts Attention
Vignetting attracts attention by creating a spotlight in the middle of our image. As a result, the edges of our frame begin to disappear.
Our eyes are drawn to brighter areas of a photo. So, for vignetted photos we pay less attention to the edges. Too, our subject is rarely at the edge of the frame. Meaning they're more brightly illuminated in photos that feature vignetting.
Directing Attention
Vignetting allows us to direct attention. Use it to fool viewers into ignoring the edge of your photo. Most people don't have tunnel vision. However, we usually turn our gaze at what we're focused on. As such, when things move in our periphery we direct our eyes to it.
Photography Vs. Vision
In photographs the frame limits the view. As a result viewers have less areas to explore. Again, this allows us to focus their attention to the subject and scene. However, viewers can become aware of the frame. If they do then, they usually move on.
How We Experience The World
Looking around is how we experience the world. Again, we turn our heads, we turn our bodies, we move our eyes about. As a result, we're usually not limited by a frame.
Additionally, we're rarely aware of the edge of our vision. There is nothing outside of it. There is no darkness, no hard edge; we simply don't see any farther into the periphery. That is, unless we turn to face it.
The Power of the Frame
The frame is a powerful tool. We use it to limit the viewer to what we want them to see. However, viewers get distracted by the frame. If the frame is noticeable then viewers will exit the photo. Or, at the very least, it will remind them they're looking at a photo. As a result, they magic is broken.
Hiding the frame
Vignetting hides the frame. By making it darker the edge of the photo draws less attention.
As a result, the viewer spends more time looking at the middle of the photo. When done correctly the viewer understand the subject and scene as we want them to. Too, it preserves the illusion that what they're seeing is real.
Vignetting & Storytelling
Vignetting is therefore a story telling aid. Additionally, it relaxes the viewer who could otherwise be apprehensive about not seeing what is beyond the frame.
How To Use Vignetting In Your Photos
Now you understand the power of vignetting. Next, we're going to learn how to apply vignetting in post production.
Applying Vignetting in Lightroom
Adobe Lightroom features a set of post-crop vignette. For example, in Lightroom Classic we add vignetting in the effects tools. These are near the bottom of the tools under the development tab.
Vignette Effects Tools
In Lightroom Classic we can choose between vignetting and reverse vignetting. Additionally, we can change the shape of the vignette to be round or square. Plus, we have the option to adjust the midpoint and to feather the effect. Finally, there is the option to not apply the vignette to highlight areas.
Alternative Vignetting
There is another way to add a vignette to our photos. In fact, this second way gives us more control over the shape, size and more. We do this with radial masks.
Using Radial Masks For Vignetting
First, we need to go to the masking tab of Lightroom Classic. Then, select the radial mask. Now, draw a circle with the mask in the area where you want the photo to appear brighter.
After creating this circle we need to click on the invert mask button. Then we can begin to bring down the exposure. Additionally I reduce the contrast and add haze. These extra steps allow the area to appear more natural. In addition, adjusting the feathering on the mask itself allows us to gradually or sharply introduce the vignette.
Mastering Vignetting
It takes time to master vignetting. However, start with small reductions in brightness. For example, using the vignette effects tools, add a 10 to 15% black vignette. Then, increase the feathering and adjust the midpoint until the effect is nearly invisible. After all, the effect shouldn't draw attention. In fact, we don't want our visitors to notice it.
Advanced Vignetting
After a while you'll begin to see the value in using inverted radial masks for vignettes. In addition to allowing you to control the exact location, and therefore to off-set them from the center, you can create a path into the photo from the edge. As a result the viewer is guided around the image exactly how you want.
Vignetting Video
Some of this material may not be easy to understand without visual aids. Therefore, I'm working on a video companion to this article. Look for the video later this fall. Of course, if you have any questions about vignetting now, contact me.


Read The Latest Photography Articles on the WDO Photography Blog

Infrared Photography Explained: How Camera Conversions Unlock A Hidden World
Infrared photography is a fascinating and visually striking form of photography. It almost feels like a visual trick. Here’s how it works!
read more…

Written by James
on April 2, 2026 at 2:38 pm

Why Your Wildlife Photos Are Not Sharp
Your wildlife photos are not sharp and you don’t know why. It might just be the atmosphere causing this distortion. Watch the video to fix it.
read more…
Written by Don Orkoskey
on April 1, 2026 at 4:48 pm

This Is Why Good Storytelling Makes People Love Your Photos
If you want people to pay more attention to your work then you need to understand how essential good storytelling is to photography.
read more…
Written by Don Orkoskey
on March 31, 2026 at 12:41 pm

The Beginner’s Guide to Shooting in Natural Light Without a Studio
Shooting in natural light can be tricky. The key is understanding how light behaves and learning to use that behavior rather than fight it.
read more…
Written by Guest Author
on March 20, 2026 at 9:38 am
Comments
0 comments