Joan Carter | February 17, 2026
If you plan a trip or want your travel shots to look cleaner and more expressive, extra gear is not required. I shoot while traveling with only my iPhone, often without time for second attempts. Over time, I learned that a few simple habits matter more than settings or accessories. This guide shares the exact steps I use in real situations and explains how to take better iPhone photos using just an iPhone when moments do not wait.
8 Practical iPhone Photography Tips to Improve Travel Photos
Travel conditions change fast. Light shifts, people move, and locations rarely allow many attempts. From my experience, not every issue comes from the camera itself. Out of the eight tips, only a few directly affect framing or exposure. The rest address preparation, storage, and review. In iPhone travel photography, these steps often decide whether a photo exists at all, stays usable, or gets lost.
Here’s how to take better travel photos:
1. Clean The Camera Lens Before Every Shoot
When a photo looks soft, washed out, or uneven, the cause often has nothing to do with camera settings or hardware limits. This detail matters more than many people expect when they try to understand how to take great iPhone photos in real travel conditions.
During a typical travel day, the phone moves between pockets, bags, hands, and open air. After a long walk, a metro ride, or a quick move from an air-conditioned interior into warm outdoor air, a thin residue often settles on the lens. In backlit scenes, night streets, sunsets, or café interiors, this film turns highlights flat, reduces contrast, and adds light haze. The result often looks like an exposure issue, even though the camera works as intended.
A quick visual check prevents this mistake. Hold the phone toward a light source and inspect the glass. If reflections appear dull or uneven, a short wipe with clean fabric restores clarity at once. This simple step saves time later and reduces the need for fixes that even photo recovery tools cannot address once the detail disappears at capture.
Why This Step Matters: A clean lens preserves sharp edges, contrast, and accurate color at the moment of capture. Even minor smudges lower clarity and create haze that editing or recovery software cannot fully remove afterward.
2. Adjust Exposure Before Each Shot
When I notice uneven light in travel photos, the issue rarely comes from the camera itself. Bright skies, dark streets, or mixed indoor light often confuse automatic exposure and lead to flat or washed images. In these moments, I rely on a short manual adjustment before the shot.
How to adjust exposure on iPhone:
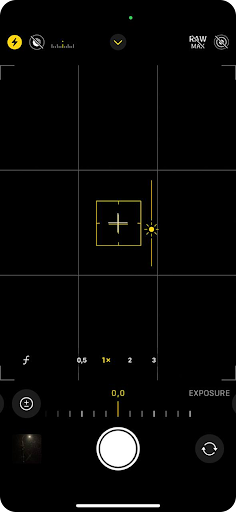
- Open the Camera app and select Photo mode. Hold the phone steady so the frame stays stable.
- Tap the screen on the main subject area to activate the brightness control.
- Locate the sun icon and slide it down if the image looks too bright, or up if the scene appears too dark.

- Watch the brightest areas, such as the sky or white surfaces, and stop once they keep visible detail.
- Press and hold on the screen until AE/AF Lock appears. If the light stays unchanged, then take the photo.
When I adjust exposure by hand, I often end up with more photos than planned. A few versions of the same scene help later, but they also take up extra space. Over a full trip, this habit adds up fast. At some point, storage limits start to matter, especially if photos stay in full resolution. That is usually the moment when I begin to think about ways to increase storage on iPhone without removing photos that still matter.
Why This Step Matters: Controlled exposure preserves detail in both bright and dark areas. The photo records balanced tones at capture, which keeps textures visible and reduces the need for heavy correction later.
3. Free Up Storage To Avoid Missed Travel Shots
Travel photos add up faster than many expect. Multiple attempts with exposure, perspective changes, and repeated frames from the same scene quickly reduce available space. When free storage drops too low, the Camera app may respond slowly, fail to save new photos, or stop at critical moments. This behavior appears even on newer iPhone models.
For stable system performance, it helps to keep a safe amount of free storage available at all times. Many Apple Support community discussions suggest that devices work more reliably when at least 25-30% of total storage remains free, as the system needs space for background processes and temporary files. Users also report noticeable slowdowns once free space falls close to 1 GB or less, which increases the risk of missed photos during trips.
Free storage does not require the removal of valuable photos. The main objective is to clear the space occupied by duplicates, similar frames, test shots, and unnecessary images that no longer serve a purpose.
Manual review inside the Photos app works, but it takes time and attention, which I often lack during travel days. In my last trips, I used Clever Cleaner to handle this part faster. It helps me spot duplicate shots, similar frames, and images I clearly do not need, directly on the iPhone. This approach keeps the library clean without manual sorting and lowers the risk of accidental deletion when storage runs low.
Why This Step Matters: Enough free storage keeps the camera responsive and avoids interruptions during shooting. A well-managed photo library leaves room for new images and reduces the chance of missed moments when light or scenes change fast.
4. Use Natural Light Direction To Shape The Scene
Light direction affects how people, objects, and places appear in photos more than most camera options. I notice this most often outside studio conditions, where light comes from windows, streets, or open spaces. In many travel situations, a small change of position works better than any adjustment inside the Camera app.
When I work with natural light, I first pay attention to its source. A café window, sunlight between buildings, or reflected light from a nearby wall often defines how a person, a plate of food, or an architectural detail looks in the frame. Light from the side often adds shape and texture to faces, streets, and surfaces. Light from slightly behind the camera helps keep details visible without loss of depth.
I avoid standing directly between the camera and the light unless a silhouette fits the moment, such as a person against a bright sky or an object at sunset. Around midday, strong sunlight creates hard shadows on faces and streets, so I move into shade or closer to surfaces that soften contrast. Before I press the shutter, I check that textures stay visible, and edges look clear rather than washed out.
Why This Step Matters: Natural light direction adds depth and separation at capture. Clear texture and balanced contrast reduce the need for heavy correction later and help photos look closer to how the scene looked in real life.
5. Use The Grid To Control Composition And Alignment
Even when light and exposure appear correct, small compositional errors often reduce the overall quality of travel photos. A tilted horizon near water, uneven building edges, or misaligned streets make images feel rushed.
I notice this most often in places where the eye expects order. A river line that drifts, a bridge that leans, café windows that tilt, or narrow streets where verticals fall apart. In these moments, the grid helps catch mistakes before they lock into the frame. It works less as a rule set and more as a quick visual anchor when time and space are limited.
I treat the grid as a guide. A glance at the horizon before a waterfront shot, a check of verticals in an old town, or a fast look at frame edges in a busy street often saves the photo from later fixes.
How to use the grid on iPhone:
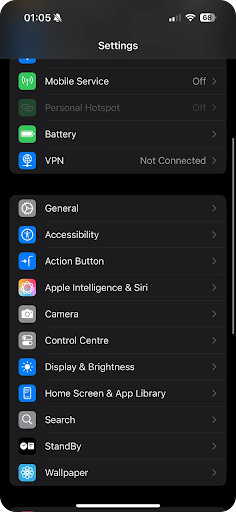
- Open Settings.
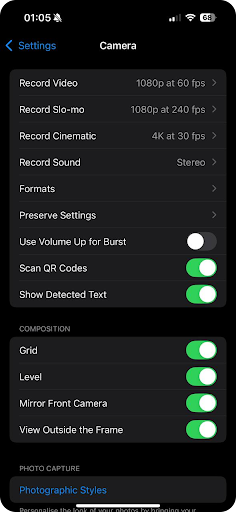
- Then tap Camera and turn on Grid.
- Align the horizon with one of the horizontal grid lines instead of the screen edge.
- Place the main subject near one of the four intersection points rather than the center.
- Use the vertical grid lines to keep buildings, poles, and walls straight.
- Leave around 10-15% space near the frame edges to avoid tight framing and forced cropping.
This approach proves most useful near water, where even a slight horizon tilt turns an otherwise calm scene into a visual distraction. The same issue appears on long streets, bridges, or waterfront promenades, where the eye expects straight lines and balanced spacing.
Why This Step Matters: Grid alignment improves structure at capture. Straight horizons and consistent spacing reduce visual distraction and limit corrective edits later, which helps preserve more of the original image and keeps photos clean and balanced.
6. Change Perspective To Improve Scene Depth
Many travel photos lose impact because the camera stays at eye level. This viewpoint often flattens the scene and removes a sense of scale, especially in streets, interiors, and crowded locations. A small perspective change helps separate the subject from the background and adds depth without extra equipment or advanced settings.
This step works best when you pause briefly before capture and check how the scene looks from a different height or position. Even a minor shift often reveals stronger foreground detail or removes visual clutter.
How to adjust perspective on iPhone:
- Open the Camera app and frame the subject at eye level to establish a reference view.
- Step closer to the subject and watch the live preview until the subject occupies more of the frame, and background elements lose dominance.
- Lower the phone to waist or knee level to introduce foreground elements such as pavement, steps, or surface texture. Confirm on the screen that these elements add depth instead of blocking the subject.
- Raise the phone slightly above eye level to clear objects behind the subject, such as crowds, signs, or railings.
- Move one or two steps left or right and review how frame edges and background alignment change before pressing the shutter.
By the way, if you use an iPad as a travel gadget, the same principles in guide apply there as well. I do not consider it practical as a primary camera, but it helps check framing, perspective, and background balance on a larger screen later in the day.
Why This Step Matters: Perspective control changes how the scene reads. A deliberate viewpoint adds depth and structure at capture, reduces background clutter, and pairs well with simple travel gadgets that help keep framing steady and consistent in real travel conditions.
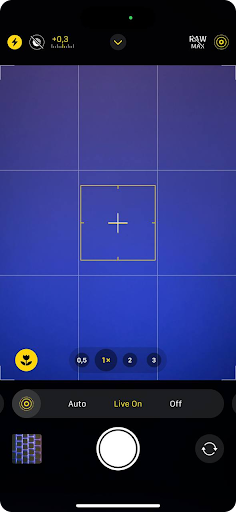
7. Turn On ProRAW for Important Shots (If You Have It)
I do not use ProRAW for every photo. Most travel moments do not need it. I turn it on only when light feels difficult or when the scene truly matters and may not repeat.
ProRAW keeps more detail in bright skies, deep shadows, and fine textures. This matters in city streets with harsh midday light, interiors with strong window contrast, sunsets, and wide landscapes. In these situations, standard photos often lose detail that cannot be recovered later.
How to turn on ProRAW for a shot:
- Open the Camera app.
- Tap the RAW button at the top of the screen, if it appears.
- Take the photo, then turn RAW off after the shot.
Because ProRAW files take up more space, I use them only for selected frames. One or two strong photos from a location work better than dozens of heavy files.
Why this step matters: ProRAW preserves more detail at capture. When light feels uneven, this format keeps room for later correction.
8. Use Live Photos on Purpose
Live Photos work best when timing feels uncertain. I rely on them for street moments, brief gestures, movement in crowds, or scenes where expressions change fast. In these cases, a single press often misses the strongest frame.
A short motion sequence increases the chance that one still image stands out later. Small changes between frames often reveal a better moment than the first tap.
How to use Live Photos intentionally:
- Turn on Live Photos in the Camera app.
- Capture the moment as usual.
- Open the photo later and select the best frame.
I avoid Live Photos for calm landscapes or static scenes. When movement defines the shot, this option adds safety without slowing the process.
Why this step matters: Live Photos reduce the risk of missed moments. For anyone learning how to take good travel photos with iPhone, one strong frame from a short sequence often looks more natural than a rushed single photo.
Extra Tips To Keep In Mind Before You Travel
At the end, I want to share a few practical habits I rely on during trips. These are small things, but in real conditions, they often decide whether I come back with better iPhone photos or miss shots entirely.
- First, I always take a power bank. Long walks, maps, tickets, and constant shooting drain the battery faster than expected. Once the phone runs out of power, photography stops, no matter how good the light looks.
- Another simple thing that often helps is a phone grip or ring holder. I use it in crowded streets or when I shoot with one hand. It adds stability and keeps frames sharp when there is no time to slow down.
- One more item that saves shots when conditions get harder is a compact tripod. I do not carry it everywhere, but it helps with night scenes, indoor light, or self-timer photos when hand stability drops.
These habits are optional, but they help keep results consistent when time is limited and conditions change fast.
Joan Carter
February 17, 2026
Joan Carter is a photography amateur with more than five years of experience as a writer. She writes about practical photo habits, data loss prevention, photo recovery, and ways photographers protect files during trips. Joan shares real-world experience and simple routines that help keep images safe on the road and after returning home.


Read The Latest Photography Articles on the WDO Photography Blog

Infrared Photography Explained: How Camera Conversions Unlock A Hidden World
Infrared photography is a fascinating and visually striking form of photography. It almost feels like a visual trick. Here’s how it works!
read more…

Written by James
on April 2, 2026 at 2:38 pm

Why Your Wildlife Photos Are Not Sharp
Your wildlife photos are not sharp and you don’t know why. It might just be the atmosphere causing this distortion. Watch the video to fix it.
read more…
Written by Don Orkoskey
on April 1, 2026 at 4:48 pm

This Is Why Good Storytelling Makes People Love Your Photos
If you want people to pay more attention to your work then you need to understand how essential good storytelling is to photography.
read more…
Written by Don Orkoskey
on March 31, 2026 at 12:41 pm

The Beginner’s Guide to Shooting in Natural Light Without a Studio
Shooting in natural light can be tricky. The key is understanding how light behaves and learning to use that behavior rather than fight it.
read more…
Written by Guest Author
on March 20, 2026 at 9:38 am
Comments
0 comments